

- Telescopes
- Overview:
Telescopes - Achromatic Refractor
- Apochromatic Refractor
- Overview:
Apochromatic Refractor - ED Refractor - less color aberration than an achromatic
- SD APO - color free 2-element APO objective
- EDT APO - 3 element ED objective
- High End APO with 3-element APO objective - no color aberation
- Flatfield APO with flat field for Astrophotography
- All Apos and EDs from all manufacturers - large overview
- TS APO and ED from Japan with high quality optics
- Overview:
- Newtonian Telescopes
- Dobsonian Telescopes
- RC Ritchey Chretien Telescopes
- Casssegrain Telescopes
- Reflektor Telescopce with Lens Correcture
- Maksutov Cassegrain Telescopes
- GoTo Telescopes
- Smart Telescopes
- Solar Telescopes H-Alpha
- Overview:
- Mounts Tripods Rings Rails Power Supply ...
- Overview:
Mounts Tripods Rings Rails Power Supply ... - Mounts Equatorial with GoTo
- Mounts Equatorial without GoTo
- Mounts Azimutal with GoTo
- Mounts Azimutal without GoTo
- Mounts GoTo - Harmonic Drive
- Travel mounts for astro imaging
- Tripods Piers Polar Wedges
- Mount Control & Electronics
- Dovetail Clamps, Plates and Mount Adapters
- Tube Rings
- Power Supply
- Counterweights Balance Weights
- Mount Accessories - Other
- Overview:
- Telescope Accessories
- Overview:
Telescope Accessories - Eyepieces
- Barlows & Reducer Lenses
- Diagonal Mirrors and Prisms
- Binocular Viewers
- Finder Scopes
- Telescope Collimation and Test
- Cleaning Tools
- Transport and Storage
- Dust protection for Telescopes & Accessories
- Stray Light Protection
- Dewcaps and Heater
- Focusers, Adapters, Motorfocus
- Telescope DIY & Improvement
- Other telescope accessories
- Replacement Parts
- Overview:
- Filters
- Overview:
Filters - Color Filters and Color Filtersets
- Nebular Filters for Visual Observing
- Neutral-Density and Polfilter
- Photo Narrowband Nebular Filters
- Photo Broadband Filters
- Photo Planetary Filters
- Photo R-G-B and IR Cut Filters
- Photo - Filtersets
- Photometric Filters
- Clip Filter for DSLR Cameras
- Filter Wheels and Filterslider
- Solar Filters for white light
- Solarfilter for H-Alpha and Calcium
- Overview:
- Adaptors
- Overview:
Adaptors - Adapter 1,25" and 24,5mm
- Adapter 2"
- Adapter T2 - M42x0.75
- Adapter M48x0,75
- Adapter M54
- Adapter SC
- Adapter M63
- Adapter M68
- Adapter to other Threads
- Adapter Extensions
- Adapter camera bayonet
- Adapter Objective Filterthread
- Adapter Quick Changing , Rotation
- Adapter Eyepiece Projection
- Adapters Tilting
- Overview:
- Astrophotography and Photography
- Overview:
Astrophotography and Photography - Cooled Cameras
- Cameras without Cooling
- Deep-Sky Cameras uncooled
- Set-Offers Camera, Filter, Wheels
- Acessories for Cameras
- Travel mounts for astro imaging
- Imaging Correctors for Telescopes
- Autoguiding Cameras & Sets
- Everything for Guiding
- Focusing aids - Bahtinov mascs
- Flat Field foils and boxes
- Lenses for Cameras
- Piggyback Camera Holder
- Camera Bags, Photocases & more
- Digital Camera and Smartphone Adapter
- Other photo accessories
- Overview:
- Binoculars, Spotting Scopes, Microscopes, Range Finders
- Overview:
Binoculars, Spotting Scopes, Microscopes, Range Finders - Spotting Scopes and Acessories
- Roof Prism Binoculars
- Binoculars with Porro prisms
- Binoculars from 100mm Aperture
- Binoculars with 1,25 inch eyepieces
- TSMX APO Binoculars
- Binoculars for Astronomy
- Binoculars Hiking Bird watching
- Monoculars - Opera Binoculars
- Accessories for Binoculars
- Range Finders
- Microscopy
- Bags for Phototripods & Binoculars
- Overview:
- Phototripods and Binomounts
- Books, Software
- Overview:
Books, Software - Books for Astronomy Beginners
- Star Charts and Planispheres
- Books about our Solar System
- Observing Tips for Amateurs
- Popular Astronomy Literature
- Teaching material
- Astrophotography books
- Telescopes, Observatories, Construction
- Calendars Yearbooks
- Software, Star Charts
- Books for Microscopers
- Books Nature and Animals
- Nature Photography TimeLapse
- Overview:
- Night Vision, Magnifiers, Weather, Domes & more
- Beginner Astronomy and Gift Ideas
- Second Hand & Special Offers
- New products
manufacturers


Manufacturer: -TS Zubehör
Product number: Digiklemme1
EUR7.95new
EUR 7,95RRP EUR 19,90you save 60.1% (EUR 11,95)
incl. 19 % VAT (DE)
The VAT indicated refers to that applicable in Germany. After logging in, the VAT amount is adjusted to the applicable VAT of the stored delivery country. Therefore, the final price may vary accordingly.
excl. 7.95 € shipping costs (DE)
more details to the shipping costs ...Please log in to calculate shipping costs to your country.
rating: 5.0 of 5Digiklemme 1 - Universal Digital Camera Adapter1


- Details..
- Technical data..
- In the box..
- Manufacturer infos..
- Safety informations..
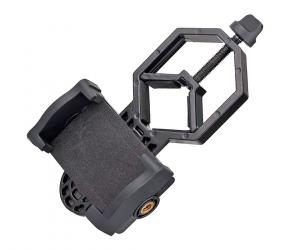
Digiklemme1 - Universal Digital Camera Adaptation for Telescopes, Spotting Scopes, ...
Take photographs through your teleskope or spotting scopeThe problem
Most compact digital cameras have an integrated objective lens which cannot be removed. If you want to take pictures through a telescope with such a camera, firstly you can´t use a T2 ring and secondly you always need an eyepiece, otherwise you won´t get an image.
The solution
The Digiklemme offers an easy to use adaptation that works with most compact digital cameras and most eyepieces for telescopes, spotting scopes, microscopes etc. Each compact digital camera has the 1/4" camera thread needed for this adaptation.
The Digiklemme is attached to an eyepiece using a bracket that works for variable eyepiece diameters. The entire device can be operated without tools.
Further below we explain in more detail how the Digiklemme 1 is used.
Which cameras can be used with the Digiklemme 1
The Digiklemme 1 universal digiscoping adaptor is compatible with all compact digital cameras and camcorders up to a weight of about 500 g. The camera only needs a thread for camera adaptation which every common camera has.On which instruments can the Digiklemme 1 be used?
The Digiklemme 1 can be used on telescopes which can accept standard 1.25" eyepieces. The eyepiece can have a physical diameter of about 30-40 mm.The Digiklemme can also be used on spotting scopes, microscopes etc. It only needs eyepieces with a physical diameter between 30 and 40 mm, regardless of the barrel or bayonet size.
A rubber-lined metal bracket is put around the eyepiece and then tightened with a thumbscrew. Under normal operating conditions, this causes no scratches and provides a firm grip as long as the eyepiece has the proper diameter.
Working with the Digiklemme1 from TS-Optics is as simple as this:
Use the bracket to attach the eyepiece to the Digiklemme We recommend to use your eyepiece with the longest focal length. For best possible field illumination it is particularly important that the "eye lens" of the eyepiece is as large as possible in diameter.
Insert the eyepiece into the bracket and tighten the bracket with the thumbscrew. Make sure that the bracket has a firm grip of the eyepiece - the entire load of the camera will be concentrated at this point!
The eyepiece barrel needs to point away from the camera adapter. If a rubber eyeguard is present we recommend to remove or retract it so that you can get closer with the camera.
Attach the camera to the Digiklemme
 Attach the camera to the universal digital camera bracket by means of the supplied 1/4" screw. The lens of the camera should point towards the eyepiece. At first keep some distance between the eyepiece and the camera.
Now attach the eyepiece to your telescope or spotting scope, if it is not permanently installed.
Next, switch on the camera. In most models the lens will now extend to some degree. (This is why it is so important to keep a distance at first, in order to avoid a collision.)
Tip from Teleskop-Service: We recommend to remove the carrying strap from the camera before attaching it to the Digiklemme. The strap tends to get tangled up.
After switching on the camera move the camera as close as possible to the eyepiece
 The Digiklemme 1 has an elongated hole in which the 1/4" screw runs. This allows you to move the camera axially.
Change the vertical position of the camera by unlocking the large star screw and then just sliding the bar up or down as desired. The knob can be seen on the bottom of the image to the left. In the latest version of the Digiklemme there are two large knurled screws. Make sure to always tighten only ONE of these two screws! If you tighten both of them you will reduce stability significantly!
Cameras with lenses that are not in line with the tripod thread: Many cameras do not have the tripod thread directly under the center axis of the lens. This is no problem at all with the Digiklemme. Just rotate the metal bar on which the camera sits a little to the side to compensate the offset. This movement will also move the camera closer to the eyepiece, so you need to compensate for this.
Practical tips from Teleskop-Service:
| Suitable for eyepieces with a physical diameter of: | 30 mm to 40 mm |
| Vertical distance from the center line of the camera lens to the bottom of the camera (tripod thread): | up to 100 mm |
| Distance between the bracket/eyepiece and the camera´s tripod thread: | up to 110 mm |
| Material: | Metal, plastic handles |
| Weight: | approx. 260 grams |
| Manufacturer / Importeur: | Teleskop-Service Ransburg GmbH |
| Street: | Von-Myra-Str. 8 |
| ZIP / City: | 85599 Parsdorf |
| Country: | Germany |
| Telefon number: | +49 89 99228750 |
| Email: | info@teleskop-service.de |
| Website: | www.teleskop-express.de |
Safety informations: PDF Download
Recommended accessories
Cleaning & Collimating
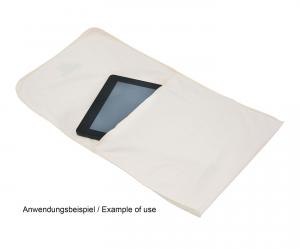
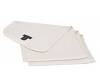
TS-Optics Optical Soft Microfibre Cleaning Cloth and Bag, 26x24 cm

EUR 7,50RRP EUR 11,95you save 37.2% (EUR 4,45)
Similar Products
TS-Optics smartphone adapter for telescopes, spotting scopes, microscopes and binoculars
EUR 33,90RRP EUR 49,90you save 32.1% (EUR 16,00)
Reviews
Written by Arthur Battenberg
on 2023-11-16
"Was man halt so braucht! Universeller geht´s nicht mehr. "
Written by Marcel Baer
on 2020-08-09
"Super Preis-Leistungsverhältnis."
Written by James Harper
on 2020-03-19
"Both the service and the product were excellent!!..."
Written by Jörg Moritzen
on 2018-06-05
"Alles OK. Bin sehr zufrieden. Produkt entspricht meinen Erwartungen. "
Written by Oliver Düpjohann
on 2018-03-28
"Gut einstellbar, gute Ergebnisse möglich!"
Written by Winfried Weber
on 2017-10-11
"Rein private nutzung. "
Written by Gerd Federbusch
on 2017-09-08
"Für den Zweck gut zu gebrauchen."
